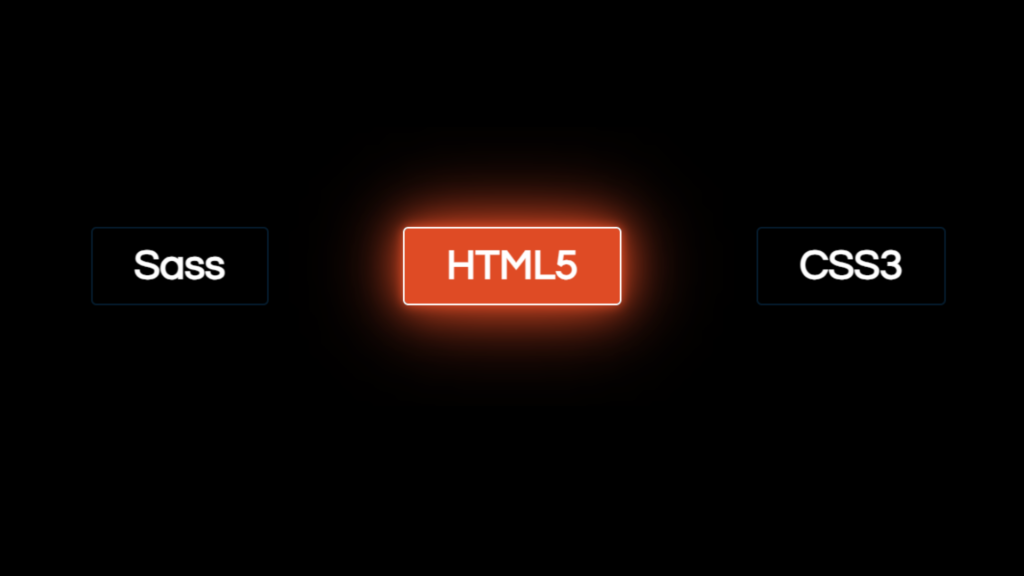
Let’s create a Liquid Neon Glowing Button using HTML and CSS. This project will add a cool, futuristic vibe to your website, sure to capture attention and make your design stand out.
We’ll keep it sleek and modern, using HTML to structure the button and CSS to achieve the mesmerizing liquid neon effect. No need for complex setups – just simple, fun coding!
Let’s dive into the code and craft a Liquid Neon Glowing Button that will add a touch of excitement to your web projects. Whether you’re a beginner or seasoned developer, this tutorial offers an exciting chance to enhance your skills and create something visually stunning.
Let’s get started and make those buttons glow!
HTML :
This HTML code creates a webpage featuring buttons with neon glowing effects upon hover. Inside a container, there’s a section containing three buttons labeled “Sass,” “HTML5,” and “CSS3.” Each button has a class prefixed with “btn” to define its styling. Additionally, the page includes references to jQuery library and a custom JavaScript file named “main.js” for handling button interactions.
<!DOCTYPE html>
<html lang="en" >
<head>
    <meta charset="UTF-8">
    <meta name="viewport" content="width=device-width, initial-scale=1.0">
    <title>Glowing Button</title><link rel="stylesheet" href="./style.css">

</head>
<body>
<!-- partial:index.partial.html -->

<div class="container">
    <section>
        <h2 class="btn btn__sass">Sass</h2>
        <h2 class="btn btn__html">HTML5</h2>
        <h2 class="btn btn__css">CSS3</h2>
    </section>
</div>

    <script type="text/javascript" src="js/jquery-3.5.1.min.js"></script>
    <script type="text/javascript" src="js/main.js"></script>
<!-- partial -->
  <script src='https://cdnjs.cloudflare.com/ajax/libs/jquery/3.5.1/jquery.min.js'></script>
</body>
</html>
CSS :
This CSS creates buttons with a liquid neon glow effect on hover. The body has a black background and white text. Buttons are labeled “Sass,” “HTML5,” and “CSS3,” each with a border and padding. On hover, buttons change border color and pseudo-elements create a liquid neon effect by transitioning height and applying box-shadow. Sass button glows pink, HTML5 orange, and CSS3 blue.
@import url("https://fonts.googleapis.com/css2?family=Questrial&display=swap");
body {
  margin: 0;
  padding: 0;
  min-height: 100vh;
  -webkit-box-sizing: border-box;
  box-sizing: border-box;
  font-family: "Questrial", Impact, Haettenschweiler, "Arial Narrow Bold", sans-serif;
  color: white;
  background: black;
}

.container {
  display: -webkit-box;
  display: -ms-flexbox;
  display: flex;
  -webkit-box-orient: vertical;
  -webkit-box-direction: normal;
  -ms-flex-direction: column;
  flex-direction: column;
  margin-top: 90px;
}

h2 {
  font-size: 40px;
  padding: 15px 40px;
  border: 2px solid #051c2e;
  border-radius: 5px;
}

section {
  display: -webkit-box;
  display: -ms-flexbox;
  display: flex;
  -webkit-box-orient: horizontal;
  -webkit-box-direction: normal;
  -ms-flex-direction: row;
  flex-direction: row;
  -ms-flex-wrap: wrap;
  flex-wrap: wrap;
  -webkit-box-pack: space-evenly;
  -ms-flex-pack: space-evenly;
  justify-content: space-evenly;
}

.btn {
  cursor: pointer;
  position: relative;
  overflow: hidden;
  -webkit-transition: 100ms 300ms;
  -o-transition: 100ms 300ms;
  transition: 100ms 300ms;
}

.btn:hover {
  border: 2px solid;
  border-radius: 5px;
}

.btn__sass::before {
  content: "";
  position: absolute;
  left: 0;
  width: 100%;
  height: 0%;
  background: #cf649a;
  z-index: -1;
  -webkit-transition: 0.8s;
  -o-transition: 0.8s;
  transition: 0.8s;
  bottom: 0;
  border-radius: 40px 40px 0 0;
  -webkit-box-shadow: 0 0 10px #cf649a, 0 0 40px #cf649a, 0 0 80px #cf649a;
  box-shadow: 0 0 10px #cf649a, 0 0 40px #cf649a, 0 0 80px #cf649a;
}

.btn__sass:hover::before {
  height: 180%;
}

.btn__sass:hover {
  -webkit-box-shadow: 0 0 10px #cf649a, 0 0 40px #cf649a, 0 0 80px #cf649a;
  box-shadow: 0 0 10px #cf649a, 0 0 40px #cf649a, 0 0 80px #cf649a;
}

.btn__html::before {
  content: "";
  position: absolute;
  left: 0;
  width: 100%;
  height: 0%;
  background: #df4b25;
  z-index: -1;
  -webkit-transition: 0.8s;
  -o-transition: 0.8s;
  transition: 0.8s;
  bottom: 0;
  border-radius: 40px 40px 0 0;
  -webkit-box-shadow: 0 0 10px #df4b25, 0 0 40px #df4b25, 0 0 80px #df4b25;
  box-shadow: 0 0 10px #df4b25, 0 0 40px #df4b25, 0 0 80px #df4b25;
}

.btn__html:hover::before {
  height: 180%;
}

.btn__html:hover {
  -webkit-box-shadow: 0 0 10px #df4b25, 0 0 40px #df4b25, 0 0 80px #df4b25;
  box-shadow: 0 0 10px #df4b25, 0 0 40px #df4b25, 0 0 80px #df4b25;
}

.btn__css::before {
  content: "";
  position: absolute;
  left: 0;
  width: 100%;
  height: 0%;
  background: #3596cf;
  z-index: -1;
  -webkit-transition: 0.8s;
  -o-transition: 0.8s;
  transition: 0.8s;
  bottom: 0;
  border-radius: 40px 40px 0 0;
  -webkit-box-shadow: 0 0 10px #3596cf, 0 0 40px #3596cf, 0 0 80px #3596cf;
  box-shadow: 0 0 10px #3596cf, 0 0 40px #3596cf, 0 0 80px #3596cf;
}

.btn__css:hover::before {
  height: 180%;
}

.btn__css:hover {
  -webkit-box-shadow: 0 0 10px #3596cf, 0 0 40px #3596cf, 0 0 80px #3596cf;
  box-shadow: 0 0 10px #3596cf, 0 0 40px #3596cf, 0 0 80px #3596cf;
}
In short, crafting a Liquid Neon Glowing Button using HTML and CSS adds a modern and attention-grabbing touch to any website. This project allows for experimentation with exciting design techniques while creating a visually stunning button that captivates users. Whether you’re a beginner or seasoned developer, this tutorial offers a fun and creative way to enhance your web design skills.
If your project has problems, don’t worry. Just click to download the source code and face your coding challenges with excitement. Have fun coding!
