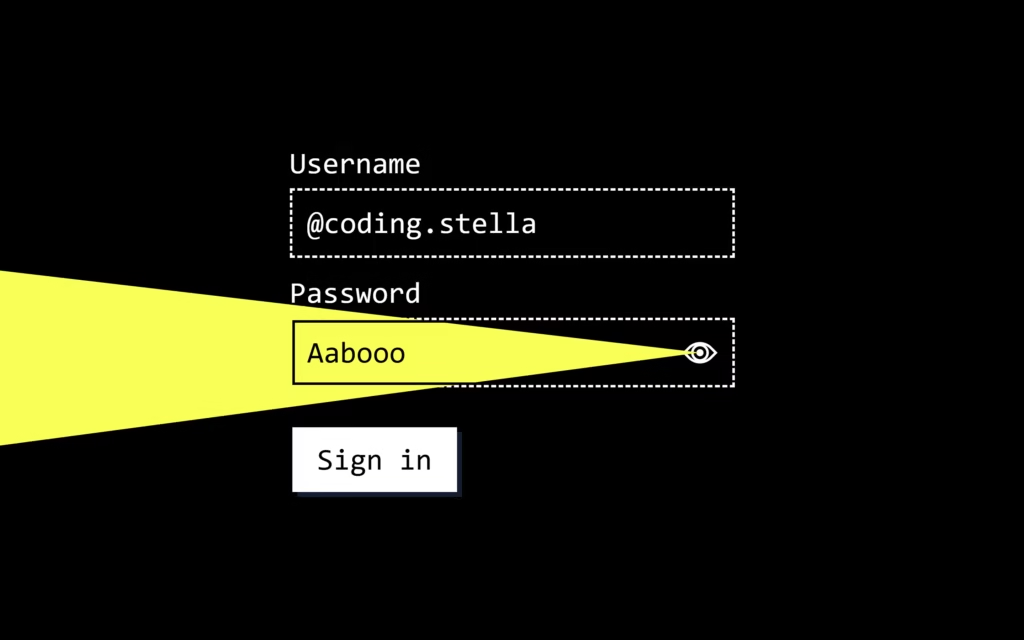
Let’s create a Password Input Light using HTML, CSS, and JavaScript. This project will feature a stylish password field that lights up or reacts dynamically as the user types, adding a modern and interactive touch to a simple input form.
We’ll use:
- HTML to structure the password input field.
- CSS to style it with glowing light effects and smooth animations.
- JavaScript to detect user input and trigger the glowing effect when typing.
Whether you’re a beginner or an experienced developer, this project is a fun and practical way to learn how to combine functionality with creative design. Let’s get started and make your password input field come alive with a glowing touch! 💡🔒
HTML :
This code creates a simple login form with a username and password field. The password box has a custom eye button that toggles visibility and triggers a light beam animation using CSS and JavaScript. The form doesn’t actually submit because it’s blocked using return false, and all styling and animation logic is handled separately in the linked CSS and JS files.
<!DOCTYPE html>
<html lang="en" >
<head>
  <meta charset="UTF-8">
  <title>Password Input Light | @coding.stella</title>
  <meta name="viewport" content="width=device-width, initial-scale=1"><link rel="stylesheet" href="https://cdnjs.cloudflare.com/ajax/libs/meyer-reset/2.0/reset.min.css">
<link rel="stylesheet" href="./style.css">
</head>
<body>

<form onsubmit="return false">
  <div class="form-item">
    <label>Username</label>
    <div class="input-wrapper">
      <input type="text" id="username" autocomplete="off" autocorrect="off" autocapitalize="off" spellcheck="false" data-lpignore="true"/>
    </div>
  </div>
  <div class="form-item">
    <label>Password</label>
    <div class="input-wrapper">
      <input type="password" id="password" autocomplete="off" autocorrect="off" autocapitalize="off" spellcheck="false" data-lpignore="true"/>
      <button type="button" id="eyeball">
        <div class="eye"></div>
      </button>
      <div id="beam"></div>
    </div>
  </div>
  <button id="submit">Sign in</button>
</form>

  <script  src="./script.js"></script>

</body>
</html>


explain code in simple and short 1 para
CSS :
This CSS sets up a clean login form theme using custom variables for colors, spacing, and effects. It centers the form, styles inputs with a boxed retro look, and creates a special state when the password is shown where the background turns dark and the beam turns yellow. The eye icon is drawn using borders and pseudo-elements, and the beam is a rotated clipped shape that appears only when the password is visible. The code mainly handles layout, colors, focus outlines, and the animated beam effect.
:root {
  --bgColor: white;
  --inputColor: black;
  --outlineColor: dodgerblue;
  --beamColor: yellow;
  --spacer: 1rem;
}

* {
  box-sizing: border-box;
}

html,
body {
  height: 100%;
}

body {
  display: grid;
  place-items: center;
  background: var(--bgColor);
}

body.show-password {
  --bgColor: black;
  --inputColor: white;
  --outlineColor: var(--beamColor);
}

form {
  transform: translate3d(0, 0, 0);
  padding: var(--spacer);
}

form>*+* {
  margin-top: var(--spacer);
}

.form-item>*+* {
  margin-top: 0.5rem;
}

label,
input,
button {
  font-size: 1.5rem;
  font-family: monospace;
  color: var(--inputColor);
}

label:focus,
input:focus,
button:focus {
  outline: 3px solid var(--outlineColor);
  outline-offset: 2px;
}

label::-moz-focus-inner,
input::-moz-focus-inner,
button::-moz-focus-inner {
  border: none;
}

label[id=password],
input[id=password],
button[id=password] {
  color: black;
}

button {
  border: none;
}

[id=submit] {
  cursor: pointer;
  margin: calc(var(--spacer) * 2) 0 0 2px;
  padding: 0.75rem 1.25rem;
  color: var(--bgColor);
  background-color: var(--inputColor);
  box-shadow: 4px 4px 0 rgba(30, 144, 255, 0.2);
}

[id=submit]:active {
  transform: translateY(1px);
}

.input-wrapper {
  position: relative;
}

input {
  padding: 0.75rem 4rem 0.75rem 0.75rem;
  width: 100%;
  border: 2px solid transparent;
  border-radius: 0;
  background-color: transparent;
  box-shadow: inset 0 0 0 2px black, inset 6px 6px 0 rgba(30, 144, 255, 0.2), 3px 3px 0 rgba(30, 144, 255, 0.2);
  -webkit-appearance: none;
}

input:focus {
  outline-offset: 1px;
}

.show-password input {
  box-shadow: inset 0 0 0 2px black;
  border: 2px dashed white;
}

.show-password input:focus {
  outline: none;
  border-color: var(--beamColor);
}

[id=eyeball] {
  --size: 1.25rem;
  display: flex;
  align-items: center;
  justify-content: center;
  cursor: pointer;
  outline: none;
  position: absolute;
  top: 50%;
  right: 0.75rem;
  border: none;
  background-color: transparent;
  transform: translateY(-50%);
}

[id=eyeball]:active {
  transform: translateY(calc(-50% + 1px));
}

.eye {
  width: var(--size);
  height: var(--size);
  border: 2px solid var(--inputColor);
  border-radius: calc(var(--size) / 1.5) 0;
  transform: rotate(45deg);
}

.eye:before,
.eye:after {
  content: "";
  position: absolute;
  top: 0;
  right: 0;
  bottom: 0;
  left: 0;
  margin: auto;
  border-radius: 100%;
}

.eye:before {
  width: 35%;
  height: 35%;
  background-color: var(--inputColor);
}

.eye:after {
  width: 65%;
  height: 65%;
  border: 2px solid var(--inputColor);
  border-radius: 100%;
}

[id=beam] {
  position: absolute;
  top: 50%;
  right: 1.75rem;
  -webkit-clip-path: polygon(100% 50%, 100% 50%, 0 0, 0 100%);
  clip-path: polygon(100% 50%, 100% 50%, 0 0, 0 100%);
  width: 100vw;
  height: 25vw;
  z-index: 1;
  mix-blend-mode: multiply;
  transition: transform 200ms ease-out;
  transform-origin: 100% 50%;
  transform: translateY(-50%) rotate(var(--beamDegrees, 0));
  pointer-events: none;
}

.show-password [id=beam] {
  background: var(--beamColor);
}
JavaScript:
This JavaScript makes the password animation work. It tracks the mouse and rotates the yellow beam by calculating the angle between the cursor and the beam, then updates a CSS variable to rotate it smoothly. When the eye button is clicked, it prevents the default action, switches the body class to show-password, changes the password field between hidden and visible, and refocuses the input.
const root = document.documentElement;
const eye = document.getElementById('eyeball');
const beam = document.getElementById('beam');
const passwordInput = document.getElementById('password');

root.addEventListener('mousemove', (e) => {
  let rect = beam.getBoundingClientRect();
  let mouseX = rect.right + (rect.width / 2);
  let mouseY = rect.top + (rect.height / 2);
  let rad = Math.atan2(mouseX - e.pageX, mouseY - e.pageY);
  let degrees = (rad * (20 / Math.PI) * -1) - 350;

  root.style.setProperty('--beamDegrees', `${degrees}deg`);
});

eye.addEventListener('click', e => {
  e.preventDefault();
  document.body.classList.toggle('show-password');
  passwordInput.type = passwordInput.type === 'password' ? 'text' : 'password'
  passwordInput.focus();
});
In conclusion, creating a Password Input Light using HTML, CSS, and JavaScript is a great way to make forms more interactive and visually appealing. By combining structure, styling, and simple logic, we’ve built a glowing input field that enhances the user experience ✨
If you run into any problems with your project, worry not. The remedy is just a click away – Download the source code and confront your coding challenges with enthusiasm. Enjoy your coding adventure!
