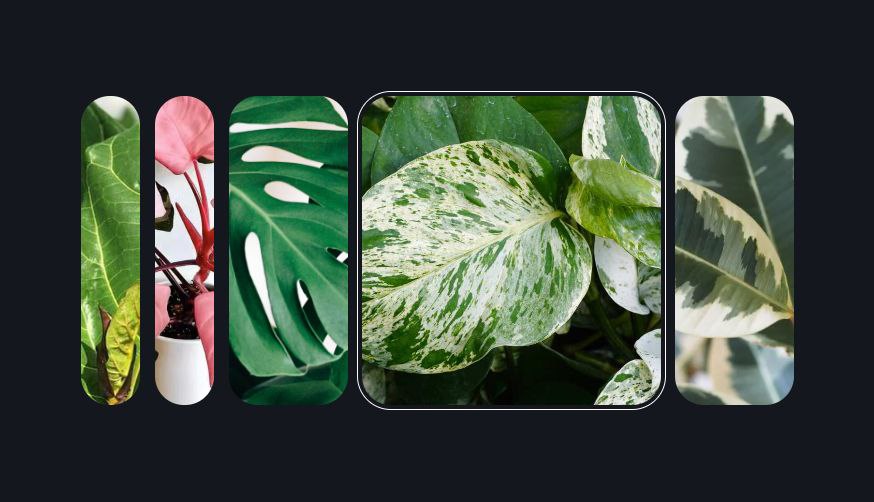
Hello cool coders! Today, let’s embark on a creative journey and build something fun – a Bouncy Image Gallery using only HTML and CSS. This project is perfect for both beginners looking to enhance their skills and seasoned developers wanting to add a playful element to their websites.
We’ll keep it simple and stylish, using HTML for the structure and CSS to create that delightful bouncy effect. No need for complicated setups – just pure coding joy!
So, join me in exploring the world of Bouncy Image Galleries. Whether you’re a coding enthusiast or just curious about web development, this tutorial offers a fantastic opportunity to learn and have a bit of fun along the way.
Ready to make your images bounce? Let’s dive into the code and create a Bouncy Image Gallery that’ll add a touch of whimsy to your web projects. Let the coding adventure begin!
HTML :
This HTML code creates a webpage featuring a bouncy image grid using CSS Grid layout. It includes a fieldset with radio buttons and labels for different plant images. Each label has a background image specified by the --_img CSS variable. The selected radio button determines the displayed image. The styling is provided by an external stylesheet referenced in the <link> tag.
<!DOCTYPE html>
<html lang="en" >
<head>
  <meta charset="UTF-8">
  <title>Bouncy image using GRID</title>
  <link rel="stylesheet" href="./style.css">

</head>
<body>
<!-- partial:index.partial.html -->
<fieldset>
  <label style="--_img: url(https://assets.codepen.io/2585/fiddle-leaf.jpeg)">
    <input type="radio" name="images" value="Fiddle Leaf">
  </label>
  <label style="--_img: url(https://assets.codepen.io/2585/pink-princess.jpeg)">
    <input type="radio" name="images" value="Pink Princess">
  </label>
  <label style="--_img: url(https://assets.codepen.io/2585/kara-eads-zcVArTF8Frs-unsplash.jpg)">
    <input type="radio" name="images" value="Monstera" checked>
  </label>
  <label style="--_img: url(https://assets.codepen.io/2585/pothos.jpeg)">
    <input type="radio" name="images" value="Pothos">
  </label>
  <label style="--_img: url(https://assets.codepen.io/2585/rubber-tree.webp)">
    <input type="radio" name="images" value="Rubber Tree">
  </label>
</fieldset>
<!-- partial -->

</body>
</html>
CSS :
This CSS code defines styles for a bouncy image grid layout using the Open Props library. It sets up a dynamic grid with five columns and handles transitions based on radio button selections. The images’ sizes change based on the selected input. It also includes styling for the overall layout, background, and focus effects.
The demo.support layer configures the HTML and body elements for proper display.
@import "https://unpkg.com/open-props" layer(design.system);

@layer demo {
  fieldset {
    grid-template-columns:
      var(--col-1, 1fr)
      var(--col-2, 1fr)
      var(--col-3, 1fr)
      var(--col-4, 1fr)
      var(--col-5, 1fr);

    @media (prefers-reduced-motion: no-preference) {
      transition: grid-template-columns 2s var(--ease-spring-5);
    }

    &:has(label:nth-child(1) > input:checked) {
      --col-1: 5fr;
      --col-2: 3fr;
    }
    &:has(label:nth-child(2) > input:checked) {
      --col-1: 2fr;
      --col-2: 5fr;
      --col-3: 2fr;
    }
    &:has(label:nth-child(3) > input:checked) {
      --col-2: 2fr;
      --col-3: 5fr;
      --col-4: 2fr;
    }
    &:has(label:nth-child(4) > input:checked) {
      --col-3: 2fr;
      --col-4: 5fr;
      --col-5: 2fr;
    }
    &:has(label:nth-child(5) > input:checked) {
      --col-4: 3fr;
      --col-5: 5fr;
    }

    > label {
      background-image: var(--_img);
      background-position: center;
      background-size: auto 125%;
    }
  }
}

@layer demo.support {
  html {
    background: #14171E;
    block-size: 100%;
  }

  body {
    min-block-size: 100%;
    display: grid;
    place-content: center;
    padding: var(--size-5);
    gap: var(--size-5);
  }

  fieldset {
    inline-size: 80vw;

    display: grid;
    grid-auto-flow: column;
    grid-template-rows: 50vh;
    gap: var(--size-3);
    border: none;

    > label {
      cursor: pointer;
      border-radius: var(--radius-4);

      &:focus-within {
        outline: 1px solid #fff;
        outline-offset: 5px;
      }

      > input {
        opacity: 0;
      }
    }
  }
}
In conclusion, creating a Bouncy Image Gallery with HTML and CSS is a simple and enjoyable way to enhance your website. Whether you’re a seasoned coder or just starting out, this tutorial offers a playful touch to make your images stand out.
Facing any problems in your project ? Stay confident! Click Download, obtain the source code, and tackle your coding issues with determination. May your coding experience be smooth and rewarding!
