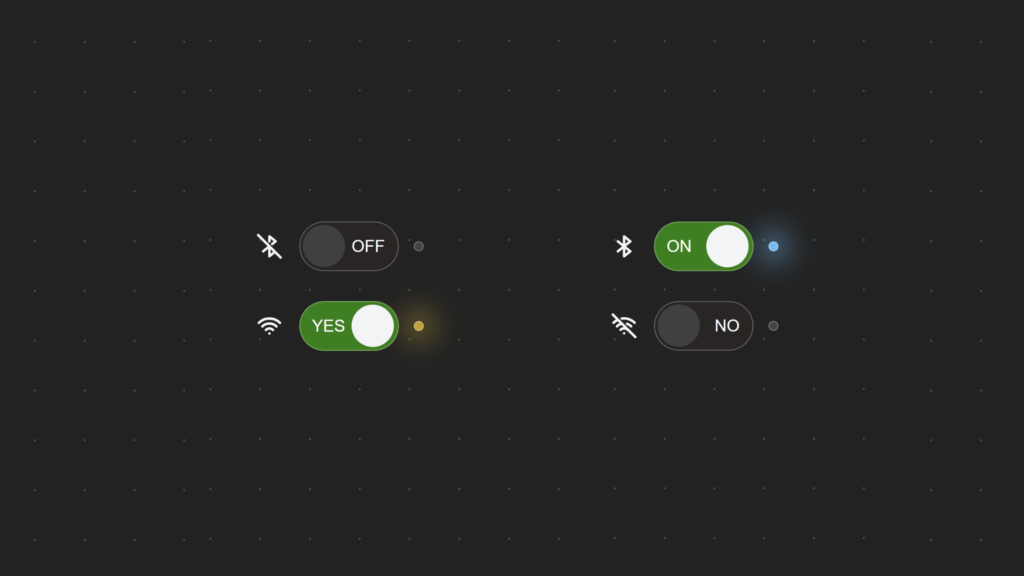
Let’s build a simple toggle switch with an LED indicator using just HTML and CSS! This fun and easy project creates a switch that turns on and off, changing the LED color to show its state – like a real power button.
We’ll use HTML for the switch structure and CSS to style and animate the LED indicator. No JavaScript needed – just clean, simple code! This project is great for beginners and perfect for adding cool interactive elements to your web designs. Let’s get started!
HTML :
This HTML code creates two stylish toggle switches with LED indicators and icons, using the external CSS from style.css. Each switch has two states (ON/OFF or YES/NO) and displays different SVG icons depending on the state. The LED light changes color when toggled, and smooth transitions make the switch interactive and visually appealing.
<!DOCTYPE html>
<html lang="en" >
<head>
  <meta charset="UTF-8">
  <title>Simple switch with led indicator | codingstella</title>
  <link rel="stylesheet" href="./style.css">
</head>
<body>

<div class="switch">
  <div class="icon">
      <svg  xmlns="http://www.w3.org/2000/svg"  width="24"  height="24"  viewBox="0 0 24 24"  fill="none"  stroke="currentColor"  stroke-width="2"  stroke-linecap="round"  stroke-linejoin="round"  >
      <path stroke="none" d="M0 0h24v24H0z" fill="none"/>
      <path d="M7 8l10 8l-5 4l0 -16l5 4l-10 8" />
    </svg>
    <svg  xmlns="http://www.w3.org/2000/svg"  width="24"  height="24"  viewBox="0 0 24 24"  fill="none"  stroke="currentColor"  stroke-width="2"  stroke-linecap="round"  stroke-linejoin="round">
      <path stroke="none" d="M0 0h24v24H0z" fill="none"/>
      <path d="M3 3l18 18" />
      <path d="M16.438 16.45l-4.438 3.55v-8m0 -4v-4l5 4l-2.776 2.22m-2.222 1.779l-5 4" />
    </svg>
  </div>
  <label for="toggle" aria-label="Toggle Filter">
    <input type="checkbox" id="toggle"   data-on="ON" data-off="OFF">
  </label>
  <span class="led"></span>
</div>

<div class="switch">
  <div class="icon">
    <svg  xmlns="http://www.w3.org/2000/svg"  width="24"  height="24"  viewBox="0 0 24 24"  fill="none"  stroke="currentColor"  stroke-width="2"  stroke-linecap="round"  stroke-linejoin="round">
      <path stroke="none" d="M0 0h24v24H0z" fill="none"/>
      <path d="M12 18l.01 0" />
      <path d="M9.172 15.172a4 4 0 0 1 5.656 0" />
      <path d="M6.343 12.343a8 8 0 0 1 11.314 0" />
      <path d="M3.515 9.515c4.686 -4.687 12.284 -4.687 17 0" />
    </svg>
    <svg  xmlns="http://www.w3.org/2000/svg"  width="24"  height="24"  viewBox="0 0 24 24"  fill="none"  stroke="currentColor"  stroke-width="2"  stroke-linecap="round"  stroke-linejoin="round">
      <path stroke="none" d="M0 0h24v24H0z" fill="none"/>
      <path d="M12 18l.01 0" />
      <path d="M9.172 15.172a4 4 0 0 1 5.656 0" />
      <path d="M6.343 12.343a7.963 7.963 0 0 1 3.864 -2.14m4.163 .155a7.965 7.965 0 0 1 3.287 2" />
      <path d="M3.515 9.515a12 12 0 0 1 3.544 -2.455m3.101 -.92a12 12 0 0 1 10.325 3.374" />
      <path d="M3 3l18 18" />
    </svg>
  </div>
  <label for="toggle-2" aria-label="Toggle Filter">
    <input type="checkbox" id="toggle-2"  checked data-on="YES" data-off="NO">
  </label>
  <span class="led"></span>
</div>

</body>
</html>
CSS :
This CSS code creates a customizable toggle switch with smooth transitions, icons, and an LED indicator. It uses CSS variables for colors, sizes, and animations, making it easy to tweak. The switch changes its background, toggle position, and LED color when activated. Icons scale in and out, and text labels show different states. There’s also a neat LED flicker effect before it turns on, and focus-visible outlines improve accessibility.
*,
::before,
::after {
  box-sizing: border-box;
}

:root {
  --clr-bg: #222;
  --clr-primary: #f5f5f5;
  --clr-secondary: #075985;
}

input{
  margin: 0;
  padding: 0;
}

html {
  background-color: var(--clr-bg);
  font-family: system-ui;
}

body {
  min-height: 100svh;
  display: flex;
  flex-direction: column;
  align-items: center;
  justify-content: center;
  gap: 1.5rem;
  color: var(--clr-primary);
  padding: 1rem;
  background-image: radial-gradient(circle, rgba(175, 208, 84, .25) 1px, rgba(0, 0, 0, 0) 1px);
  background-size: 40px 40px;
  overflow: hidden
}

.switch{
  --switch-width: 80px;
  --switch-height: calc(var(--switch-width) / 2);
  --switch-border-radius: 999vw; /* this will also adjust the radius on the toggle */
  --switch-clr-border: rgba(255 255 255 / .25);
  --switch-clr-bg: rgb(41 37 36);
  --switch-clr-bg-on: green;
  --switch-inset: 2px;
  --switch-duration: 300ms;

  --toggle-size: calc(var(--switch-height) - var(--switch-inset) * 3);
  --toggle-gap: calc(var(--toggle-size) * 1.5);
  --toggle-bg: #404040;
  --toggle-bg-on: #F3F4F6;

  --led-size: 8px;
  --led-color-off: rgba(255 255 255 / .15);
  --led-color-on: rgb(56, 189, 248);
  --led-color-loading: rgb(234 179 8);
  --led-duration: 3s;
  --led-delay: 500ms;
  --led-blur: 12px;
  --led-blur-distance: -.5rem;

  display: flex;
  align-items: center;
  gap: .75rem;
  width: fit-content;
}

.switch label{
  position: relative;
  cursor: pointer;
  overflow: hidden;
  width: var(--switch-width);
  height: var(--switch-height);
  border-radius: var(--switch-border-radius);
  border: 1px solid var(--switch-clr-border);
  outline: 1px dashed transparent;
  outline-offset: 4px;
  color: var(--switch-clr-txt);
  background-color: var(--switch-clr-bg);
  isolation: isolate;
  transition-property: background-color;
  transition-duration: var(--switch-duration);
  transition-timing-function: ease-in-out;
  transition-delay: var(--switch-delay,0ms);
}

.switch > .icon{
  display: grid;
  grid-template-areas: "stack";
}

.switch > .icon > svg{
  grid-area: stack;
  scale: var(--icon-on,0);
  transition: scale 150ms ease-in-out var(--icon-delay,0ms);
}

.switch > .icon > svg:last-of-type{
  scale: var(--icon-off,1);
}

.switch input[type="checkbox"] {
  position: absolute;
  pointer-events: none;
  appearance: none;
  border: none;
  outline: none;
  border-radius: inherit;
  background-color: var(--toggle-bg);
  top: var(--switch-inset);
  left: var(--toggle-x,var(--switch-inset));
  width: var(--toggle-size);
  height: var(--toggle-size);
  display: flex;
  align-items: center;
  justify-content: center;
  gap: var(--toggle-gap);
  transition-property: left, background-color;
  transition-duration: var(--switch-duration);
  transition-timing-function: ease-in-out;
}

.switch input[type="checkbox"]::before,
.switch input[type="checkbox"]::after{
  position: relative;
  color: white;
  transition: scale var(--switch-duration);
}

.switch input[type="checkbox"]::before{
  content: attr(data-on);
  scale: var(--label-scale-on, .75);
}

.switch input[type="checkbox"]::after{
   content: attr(data-off);
  scale: var(--label-scale-off, 1);
}

.switch > .led{
  position: relative;
  width: var(--led-size);
  height: var(--led-size);
  display: block;
  border: 1px solid rgba(255 255 255 / .25);
  border-radius: 50%;
  background-color: var(--led-color-off) ;
  transition: background-color 50ms;
  animation: var(--led-animation,"")
}

.switch > .led:before{
  content: '';
  position: absolute;
  inset: var(--led-blur-distance);
  z-index: -1;
  border-radius: inherit;
  filter: blur(var(--led-blur));
  opacity: .75;
  animation: var(--led-animation,"")
}

.switch:has(input[type="checkbox"]:focus-visible) label{
  outline-color: white;
}

/* switch "on" */
.switch:has(input[type="checkbox"]:checked){
  --switch-clr-bg: var(--switch-clr-bg-on);
  --switch-delay: 250ms; /* slight delay on background color change */
  --toggle-x: calc(50% + var(--switch-inset));
  --toggle-clr-bg: green;
  --toggle-bg: var(--toggle-bg-on);
  --led-animation: toggle var(--led-duration) linear forwards var(--led-delay);
  --icon-on: 1;
  --icon-off: 0;
  --icon-delay: 250ms;
  --label-scale-off: .75;
  --label-scale-on: 1;
}

@keyframes toggle{
  0%,10%,20%,30%,40%,50%,60%,70%,80%{
    background-color: var(--led-color-off);
  }
  5%,15%,25%,35%,45%,55%,65%,75%,85%{
    background-color: var(--led-color-loading);
  }
  100%{
    background-color: var(--led-color-on);
  }
}
The Simple Switch with LED Indicator is a fun and easy project made with just HTML and CSS. It helps you understand how to create interactive elements with simple styling and transitions. Keep experimenting and try adding more effects to make it even cooler! 💡
If your project has problems, don’t worry. Just click to download the source code and face your coding challenges with excitement. Have fun coding!
