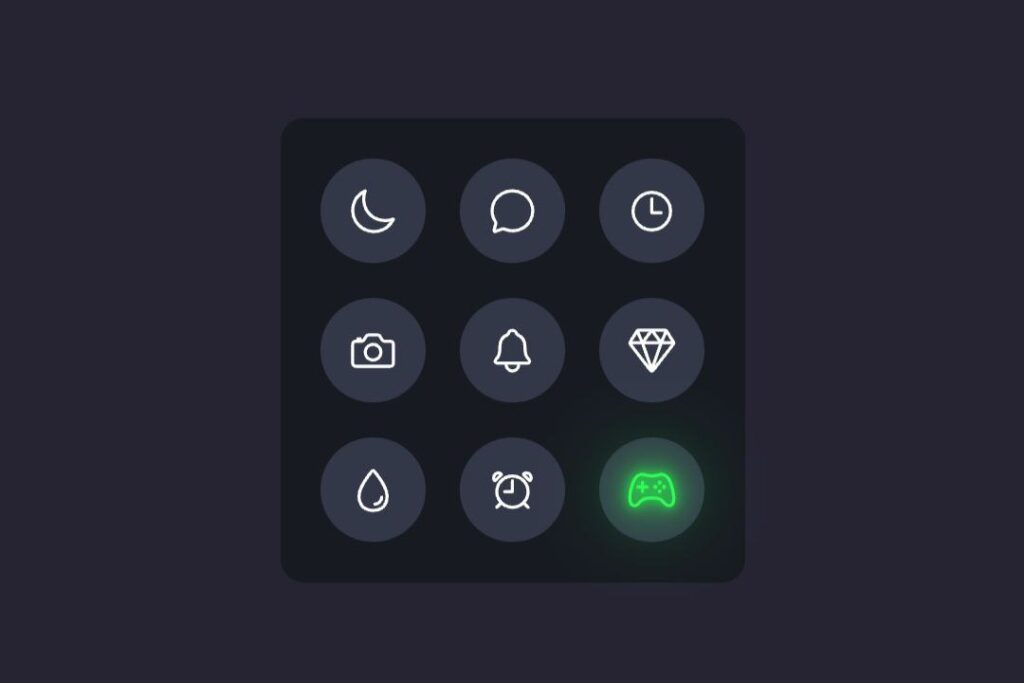
If you’re looking to add a touch of modern simplicity to your website’s navigation, this quick guide is for you! We’ll walk through the process of creating or updating a 9 Dot Navigation Menu using HTML, CSS, and a dash of JavaScript. Check Old Version of 9 Dot Navigation Menu.
In this straightforward tutorial, we’ll cover the essential steps to build a clean and stylish 9 Dot Navigation Menu. This menu style, popularized by many modern web applications, provides a visually appealing and user-friendly navigation experience.
No need to worry if you’re just starting out – this guide is beginner-friendly. We’ll explore the basic HTML structure for your menu, style it with CSS to achieve a sleek look, and introduce a bit of JavaScript for that extra touch of interactivity.
By the end of this tutorial, you’ll have a practical and stylish 9 Dot Navigation Menu that’s ready to enhance the navigation experience for your website visitors. Let’s dive in and give your site a modern twist with this simple yet effective navigation solution.
HTML :
The provided code is an HTML document that represents a new 9-dot navigation menu. It consists of a container with nine icons, each represented by a <span> element. The icons are from the Ionicons library and include camera, diamond, chat bubble, alarm, game controller, moon, notifications, water, and time. The menu has a visually appealing design and can be used for navigation purposes on a website or application.
<!DOCTYPE html>
<html lang="en" >
<head>
  <meta charset="UTF-8">
  <title>New 9 Dot Navigation Menu | CodingStella</title>
  <link rel="stylesheet" href="./style.css">

</head>
<body>
<!-- partial:index.partial.html -->
<div class="navigation">
  <span style="--i:0;--x:-1;--y:0;">
    <ion-icon name="camera-outline"></ion-icon>
  </span>
  <span style="--i:1;--x:1;--y:0;">
    <ion-icon name="diamond-outline"></ion-icon>
  </span>
  <span style="--i:2;--x:0;--y:-1;">
    <ion-icon name="chatbubble-outline"></ion-icon>
  </span>
  <span style="--i:3;--x:0;--y:1;">
    <ion-icon name="alarm-outline"></ion-icon>
  </span>
  <span style="--i:4;--x:1;--y:1;">
    <ion-icon name="game-controller-outline"></ion-icon>
  </span>
  <span style="--i:5;--x:-1;--y:-1;">
    <ion-icon name="moon-outline"></ion-icon>
  </span>
  <span style="--i:6;--x:0;--y:0;">
    <ion-icon name="notifications-outline"></ion-icon>
  </span>
  <span style="--i:7;--x:-1;--y:1;">
    <ion-icon name="water-outline"></ion-icon>
  </span>
  <span style="--i:8;--x:1;--y:-1;">
    <ion-icon name="time-outline"></ion-icon>
  </span>
</div>
<!-- partial -->
  <script src='https://unpkg.com/ionicons@5.5.2/dist/ionicons/ionicons.esm.js'></script>
<script src='https://unpkg.com/ionicons@5.5.2/dist/ionicons/ionicons.js'></script><script  src="./script.js"></script>

</body>
</html>
CSS :
The provided CSS code styles a 9-dot navigation menu. It sets the overall layout of the page, centers it vertically and horizontally, and applies a dark background color. The navigation menu itself is a square container that transitions in size when clicked. Each dot within the container is represented by a <span> element and transitions in size and position when the menu is active. The dots contain icons from the Ionicons library, which also transition in size and color when the menu is active or hovered over.
* {
  margin: 0;
  padding: 0;
  box-sizing: border-box;
}

body {
  display: flex;
  justify-content: center;
  align-items: center;
  min-height: 100vh;
  background: #262433;
}

.navigation {
  position: relative;
  width: 70px;
  height: 70px;
  background: #171b21;
  border-radius: 10px;
  cursor: pointer;
  display: flex;
  justify-content: center;
  align-items: center;
  transition: 0.5s;
  transition-delay: 0.8s;
}
.navigation.active {
  width: 200px;
  height: 200px;
  transition-delay: 0s;
}

.navigation span {
  position: absolute;
  width: 7px;
  height: 7px;
  display: flex;
  justify-content: center;
  align-items: center;
  background: #fff;
  border-radius: 50%;
  transform: translate(calc(12px * var(--x)), calc(12px * var(--y)));
  transition: transform 0.5s, width 0.5s, height 0.5s, background 0.5s;
  transition-delay: calc(0.1s * var(--i));
}
.navigation.active span {
  width: 45px;
  height: 45px;
  background: #333849;
  transform: translate(calc(60px * var(--x)), calc(60px * var(--y)));
}

.navigation span ion-icon {
  transition: 0.5s;
  font-size: 0em;
}

.navigation.active span ion-icon {
  font-size: 1.35em;
  color: #fff;
}
.navigation.active span:hover ion-icon {
  color: #2dfc52;
  filter: drop-shadow(0 0 2px #2dfc52) drop-shadow(0 0 5px #2dfc52)
    drop-shadow(0 0 15px #2dfc52);
}
JavaScript:
The provided JavaScript code adds an event listener to the .navigation element. When the element is clicked, it toggles the active class on the element, which triggers a transition effect. This is achieved by using the classList.toggle() method to add or remove the active class on the .navigation element. The code utilizes CSS transitions and transforms to animate the size and position of the child span elements within the .navigation container.
const navigation = document.querySelector(".navigation");

navigation.addEventListener("click", () => {
  navigation.classList.toggle("active");
});
In summary, you’ve successfully created a New/Updated 9 Dot Navigation Menu for your website using HTML, CSS, and a bit of JavaScript. This simple and beginner-friendly guide has empowered you to enhance your site’s aesthetics and improve user navigation.
If your project encounters any bumps in the road, don’t be discouraged. The source code is within reach. Just click Download to start your coding adventure. Happy coding!

1 Comment
Pingback: How to make a 9 Dot Navigation Menu in HTML CSS & JavaScript | Coding Stella