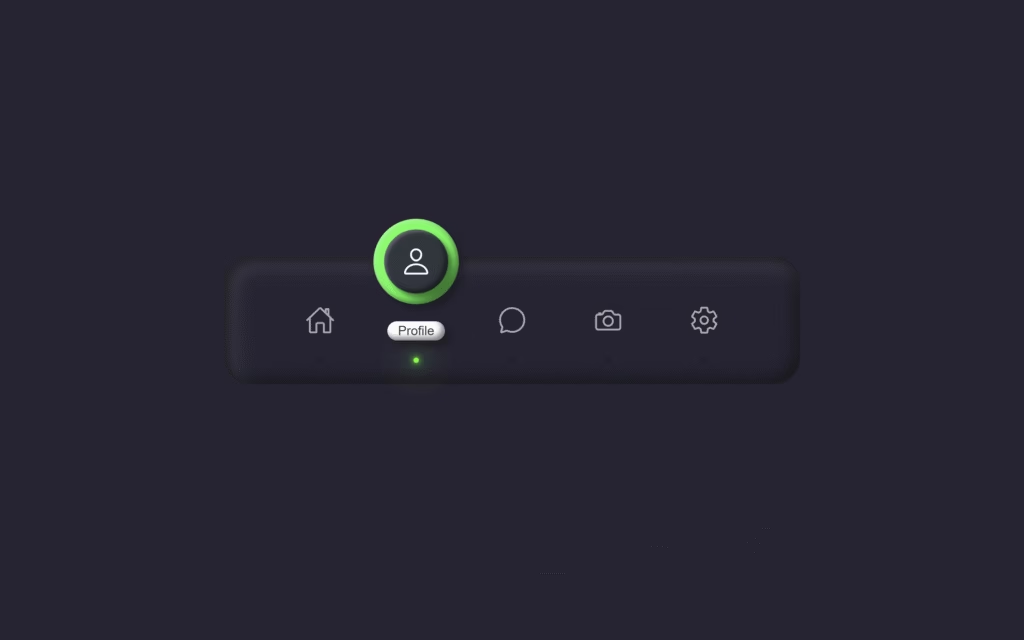
Let’s create a Magic Navigation Tabs Menu using HTML, CSS, and JavaScript. This project will feature a stylish navigation bar with smooth transitions, animated indicators, and interactive tab switching – perfect for any modern website.
We’ll use:
- HTML to structure the navigation tabs.
- CSS to style the menu with glowing effects and smooth animations.
- JavaScript to handle active tab changes and interactive effects.
This project is a fun and creative way to learn how navigation menus work and how to make them visually appealing with simple code. Let’s dive in and make your website navigation truly magical! ✨
HTML :
The provided code is an HTML document that creates a navigation menu with icons using the Ionicons library. Each menu item consists of an icon and text. The active menu item is highlighted with the “active” class. The code also includes a JavaScript file for the Ionicons library. The CSS styles define the appearance of the navigation menu, including hover effects and transitions.
<!DOCTYPE html>
<html lang="en" >
<head>
  <meta charset="UTF-8">
  <title>Magic Navigation Tabs Menu | @coding.stella</title>
  <link rel="stylesheet" href="./style.css">

</head>
<body>
<!-- partial:index.partial.html -->
<ul class="navigation">
  <li class="active">
    <a href="#">
      <span class="icon">
        <ion-icon name="home-outline"></ion-icon>
      </span>
      <span class="text">Home</span>
    </a>
  </li>
  <li>
    <a href="#">
      <span class="icon">
        <ion-icon name="person-outline"></ion-icon>
      </span>
      <span class="text">Profile</span>
    </a>
  </li>
  <li>
    <a href="#">
      <span class="icon">
        <ion-icon name="chatbubble-outline"></ion-icon>
      </span>
      <span class="text">Messages</span>
    </a>
  </li>
  <li>
    <a href="#">
      <span class="icon">
        <ion-icon name="camera-outline"></ion-icon>
      </span>
      <span class="text">Photos</span>
    </a>
  </li>
  <li>
    <a href="#">
      <span class="icon">
        <ion-icon name="settings-outline"></ion-icon>
      </span>
      <span class="text">Settings</span>
    </a>
  </li>
</ul>
<!-- partial -->
  <script src='https://unpkg.com/ionicons@5.5.2/dist/ionicons/ionicons.js'></script><script  src="./script.js"></script>

</body>
</html>
CSS :
The provided code is a CSS stylesheet that styles a navigation menu using the “Poppins” font from Google Fonts. The stylesheet sets the font-family to “Poppins” for all elements and applies various styles to create a visually appealing navigation menu. The menu items have a hover effect and an active state that changes the background color and adds a glowing effect. The code also includes some CSS animations for the menu items.
@import url("https://fonts.googlesapis.com/css?family=Poppins:200,300,400,500,600,700,800,900&display=swap");

* {
  margin: 0;
  padding: 0;
  box-sizing: border-box;
  font-family: "Poppins", sans-serif;
}

body {
  display: flex;
  justify-content: center;
  align-items: center;
  min-height: 100vh;
  background: #262433;
}

.navigation {
  position: relative;
  width: 540px;
  height: 120px;
  background: #242433;
  box-shadow: inset 5px 5px 10px rgba(0, 0, 0, 0.5),
    inset 5px 5px 20px rgba(255, 255, 255, 0.2),
    inset -5px -5px 15px rgba(0, 0, 0, 0.75);
  border-radius: 25px;
  display: flex;
  justify-content: center;
  align-items: center;
}

.navigation li {
  position: relative;
  list-style: none;
  width: 80px;
  margin: 0 5px;
}

.navigation li::before {
  content: "";
  position: absolute;
  top: 35px;
  left: 50%;
  transform: translateX(-50%);
  width: 5px;
  height: 5px;
  background: #222;
  border-radius: 50%;
  transition: 0.5s;
}

.navigation li.active::before {
  background: #0f0;
  box-shadow: 0 0 5px #0f0, 0 0 10px #0f0, 0 0 20px #0f0, 0 0 30px #0f0,
    0 0 40px #0f0, 0 0 50px #0f0;
}

.navigation li a {
  display: flex;
  align-items: center;
  justify-content: center;
  flex-direction: column;
  text-decoration: none;
}

.navigation li a .icon {
  position: absolute;
  font-size: 1.75em;
  width: 80px;
  height: 80px;
  display: flex;
  align-items: center;
  justify-content: center;
  color: #aaa;
  border-radius: 50px;
  transition: 0.5s;
  transition-delay: 0.2s;
}

.navigation li.active a .icon {
  background: #29fd53;
  color: #fff;
  transform: translateY(-55px);
  box-shadow: 5px 5px 7px rgba(0, 0, 0, 0.25),
    inset 2px 2px 3px rgba(255, 255, 255, 0.25),
    inset -3px -3px 5px rgba(0, 0, 0, 0.5);
  transition-delay: 0s;
}

.navigation li a .icon::before {
  content: "";
  position: absolute;
  inset: 10px;
  background: #2f363e;
  border-radius: 50%;
  box-shadow: 5px 5px 5px rgba(0, 0, 0, 0.5),
    inset 2px 2px 3px rgba(255, 255, 255, 0.25),
    inset -3px -3px 5px rgba(0, 0, 0, 0.5);
  transform: scale(0);
  transition: 0.5s;
}

.navigation li.active a .icon::before {
  transform: scale(1);
}

.navigation li a .text {
  position: absolute;
  font-size: 0.75em;
  color: #2f363e;
  opacity: 0;
  transform: translateY(20px);
  padding: 2px 10px;
  background: #fff;
  border-radius: 15px;
  box-shadow: 5px 5px 7px rgba(0, 0, 0, 0.25),
    inset -3px -3px 5px rgba(0, 0, 0, 0.5);
  transition: 0.5s;
  transition-delay: 0s;
}

.navigation li.active a .text {
  opacity: 1;
  transform: translateY(10px);
  transition-delay: 0.2s;
}
JavaScript:
The provided code selects all the <li> elements within the .navigation class and assigns them to the list variable. It then defines a function called activeLink that removes the “active” class from all the <li> elements and adds the “active” class to the clicked element. Finally, it adds an event listener to each <li> element that triggers the activeLink function when clicked.
let list = document.querySelectorAll(".navigation li");
function activeLink() {
  list.forEach((item) => item.classList.remove("active"));
  this.classList.add("active");
}
list.forEach((item) => item.addEventListener("click", activeLink));
In short, the Magic Navigation Tabs Menu built with HTML, CSS, and JavaScript adds a sleek and dynamic touch to your website. It’s interactive, easy to use, and looks awesome – a great way to enhance your front-end skills while making your UI stand out! 🌟
If your project has problems, don’t worry. Just click to download the source code and face your coding challenges with excitement. Have fun coding!
