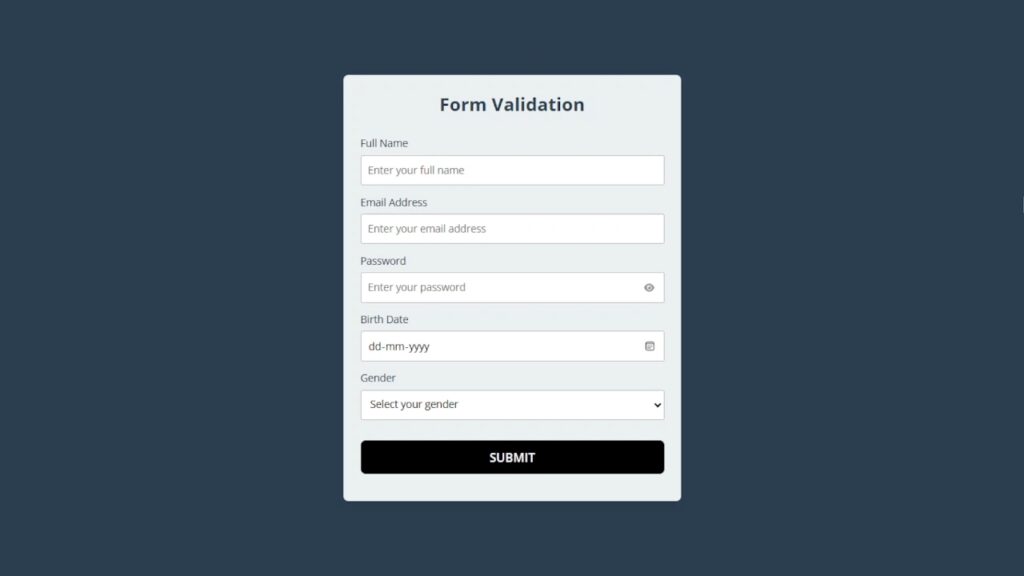
In this blog post for new web developers, you’ll learn step by step how to make a form that looks good on different devices using HTML and CSS. Then, you’ll learn how to add these rules using JavaScript to make sure the info people type meets the guidelines.
We’ll use HTML for the form structure, CSS for a bit of styling, and JavaScript for validation. No need for anything complicated – just straightforward coding to enhance your forms.
Join me on this coding journey into Form Validation. It’s a simple yet effective way to ensure the accuracy of user input. Ready to make your forms more reliable? Let’s dive in!
HTML :
This HTML code creates a cool and simple form with validation features. It includes fields for full name, email address, password, birth date, and gender. The eye icon next to the password field provides a toggle for password visibility. The form also has a submit button. Upon successful form submission, a “Thank you” message is displayed in a hidden content div. The associated JavaScript file, “script.js,” handles the form validation and submission logic. The FontAwesome library is used for icons.
<!DOCTYPE html>
<html lang="en" >
<head>
  <meta charset="UTF-8">
  <title>Cool Simple Form Validation</title>
  <link rel='stylesheet' href='https://cdnjs.cloudflare.com/ajax/libs/font-awesome/6.2.1/css/all.min.css'><link rel="stylesheet" href="./style.css">

</head>
<body>
<!-- partial:index.partial.html -->
<form id="myForm">
  <h2>Form Validation</h2>
  <div class="form-group fullname">
    <label for="fullname">Full Name</label>
    <input type="text" id="fullname" placeholder="Enter your full name">
  </div>
  <div class="form-group email">
    <label for="email">Email Address</label>
    <input type="text" id="email" placeholder="Enter your email address">
  </div>
  <div class="form-group password">
    <label for="password">Password</label>
    <input type="password" id="password" placeholder="Enter your password">
    <i id="pass-toggle-btn" class="fa-solid fa-eye"></i>
  </div>
  <div class="form-group date">
    <label for="date">Birth Date</label>
    <input type="date" id="date" placeholder="Select your date">
  </div>
  <div class="form-group gender">
    <label for="gender">Gender</label>
    <select id="gender">
      <option value="" selected disabled>Select your gender</option>
      <option value="Male">Male</option>
      <option value="Female">Female</option>
      <option value="Other">Other</option>
    </select>
  </div>
  <div class="form-group submit-btn">
    <input type="submit" value="Submit">
  </div>
</form>

<div id="thank-you-content" style="display: none; color: #ffffff";>
  <h1>Thank you for filling out the form correctly 💙</h1>
</div>
<!-- partial -->
  <script  src="./script.js"></script>

</body>
</html>
CSS :
This CSS code styles a clean and user-friendly form with a centered layout, using the Open Sans font. It features subtle input field borders, a contrasting background, and responsive design. The password field includes an eye icon for visibility. The submit button has a bold appearance with hover effects. Error states are indicated with red borders.
@import url("https://fonts.googleapis.com/css2?family=Open+Sans:wght@400;500;600;700&display=swap");

* {
  margin: 0;
  padding: 0;
  box-sizing: border-box;
  font-family: "Open Sans", sans-serif;
}

body {
  display: flex;
  align-items: center;
  justify-content: center;
  padding: 0 10px;
  min-height: 100vh;
  background: #2c3e50;
}

form {
  padding: 25px;
  background: #ecf0f1;
  max-width: 500px;
  width: 100%;
  border-radius: 7px;
  box-shadow: 0 10px 15px rgba(0, 0, 0, 0.05);
  color: #2c3e50;
}

form h2 {
  font-size: 27px;
  text-align: center;
  margin: 0px 0 30px;
}

form .form-group {
  margin-bottom: 15px;
  position: relative;
}

form label {
  display: block;
  font-size: 15px;
  margin-bottom: 7px;
}

form input,
form select {
  height: 45px;
  padding: 10px;
  width: 100%;
  font-size: 15px;
  outline: none;
  background: #fff;
  border-radius: 3px;
  border: 1px solid #bfbfbf;
}

form input:focus,
form select:focus {
  border-color: #9a9a9a;
}

form input.error,
form select.error {
  border-color: #f91919;
  background: #f9f0f1;
}

form small {
  font-size: 14px;
  margin-top: 5px;
  display: block;
  color: #f91919;
}

form .password i {
  position: absolute;
  right: 0px;
  height: 45px;
  top: 28px;
  font-size: 13px;
  line-height: 45px;
  width: 45px;
  cursor: pointer;
  color: #939393;
  text-align: center;
}

.submit-btn {
  margin-top: 30px;
  text-align: center;
}

.submit-btn input {
  color: #ffffff;
  border: none;
  height: 50px;
  width: 100%;
  font-size: 18px;
  padding: 0;
  border-radius: 8px;
  cursor: pointer;
  font-weight: 600;
  text-transform: uppercase;
  background: #000000;
  transition: background 0.3s ease, transform 0.3s ease;
  overflow: hidden;
}

.submit-btn input:hover {
  background: #1a1a1a;
}

.submit-btn input:active {
  transform: scale(0.95);
}
JavaScript :
This JavaScript code enhances a form’s functionality. It includes password strength validation, error handling, and a toggle for password visibility. The code ensures proper form data entry, validates email format, and displays error messages. Upon successful submission, it hides the form and reveals a thank-you message.
// Element selection
const form = document.getElementById("myForm"),
  passwordInput = document.getElementById("password"),
  passToggleBtn = document.getElementById("pass-toggle-btn"),
  thankYouMessage = document.getElementById("thank-you-content");

// Error handling function
const showError = (field, errorText) => {
  field.classList.add("error");
  const errorElement = document.createElement("small");
  errorElement.classList.add("error-text");
  errorElement.innerText = errorText;
  field.closest(".form-group").appendChild(errorElement);
};

// Password strength check
const checkPasswordStrength = (password) =>
  /^(?=.*\d)(?=.*[a-z])(?=.*[A-Z])(?=.*[!@#$%^&*]).{8,}$/.test(password);

// Validate password
const validatePassword = (password) => {
  if (password === "") {
    showError(passwordInput, "Enter your password");
  } else if (!checkPasswordStrength(password)) {
    showError(
      passwordInput,
      "Please enter at least 8 characters with a number, symbol, lowercase, and uppercase letter."
    );
  }
};

// Form data handling
const handleFormData = (e) => {
  e.preventDefault();
  const [fullnameInput, emailInput, dateInput, genderInput] = [
    "fullname",
    "email",
    "date",
    "gender"
  ].map((id) => document.getElementById(id));

  const [fullname, email, password, date, gender] = [
    fullnameInput,
    emailInput,
    passwordInput,
    dateInput,
    genderInput
  ].map((input) => input.value.trim());

  const emailPattern = /^[^ ]+@[^ ]+\.[a-z]{2,3}$/;

  document
    .querySelectorAll(".form-group .error")
    .forEach((field) => field.classList.remove("error"));
  document
    .querySelectorAll(".error-text")
    .forEach((errorText) => errorText.remove());

  if (fullname === "") showError(fullnameInput, "Enter your full name");
  if (!emailPattern.test(email))
    showError(emailInput, "Enter a valid email address");
  validatePassword(password);
  if (date === "") showError(dateInput, "Select your date of birth");
  if (gender === "") showError(genderInput, "Select your gender");

  if (!document.querySelectorAll(".form-group .error").length) {
    form.style.display = "none";
    thankYouMessage.style.display = "block";
  }
};

// Toggle password visibility
passToggleBtn.addEventListener("click", () => {
  passToggleBtn.className =
    passwordInput.type === "password"
      ? "fa-solid fa-eye-slash"
      : "fa-solid fa-eye";
  passwordInput.type = passwordInput.type === "password" ? "text" : "password";
});

// Form submission event handling
form.addEventListener("submit", handleFormData);
Success! We’ve nailed Form Validation using HTML, CSS, and JavaScript. Whether you’re a coding pro or just starting, you’ve aced a crucial web development skill. Kudos on completing this tutorial! Keep coding, keep creating, and enjoy your new found form validation expertise. Well done!
In case you face any glitches during your project, don’t stress. The source code is at your fingertips. Hit the Download button and commence your coding escapade. Wishing you joyful coding!
