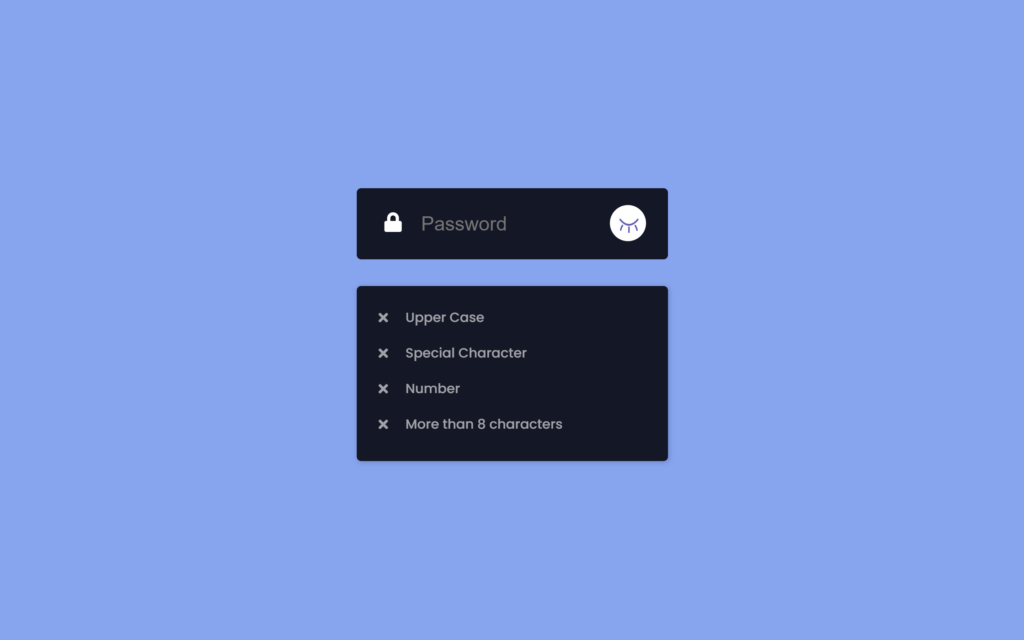
Let’s create a Password Validator using HTML, CSS, and JavaScript. This project will feature a form where users can enter a password, with validation criteria displayed and updated in real-time to indicate whether the password meets the specified requirements.
We’ll use HTML for the form structure, CSS for styling the validation indicators, and JavaScript to handle the validation logic and update the indicators dynamically as the user types.
Let’s dive into building the Password Validator. Whether you’re a beginner or an experienced developer, this project provides valuable practice in creating interactive forms and real-time validation for an enhanced user experience. Let’s help users create strong passwords with ease!
HTML :
This HTML code creates a simple password validation form that checks if a password meets certain requirements. It includes an input field for entering a password and uses icons to indicate each rule: at least one uppercase letter, one special character, one number, and a length of more than eight characters. An image of an eye icon is used to toggle password visibility, and JavaScript functions (textChange() and toggle()) are triggered for validation and visibility. External CSS and JavaScript files style the layout and add functionality, and Font Awesome is used for the icons.
<!DOCTYPE html>
<html lang="en" >
<head>
  <meta charset="UTF-8">
  <title> Absolute Password Validator </title>
  <link rel="stylesheet" href="./style.css">

</head>
<body>

<div class="container">
        <div class="formbox">
            <div class="inner"></div>
            <div><i class="fas fa-lock"></i></div>
            <div><input type="password"
                    placeholder="Password"
                    id="myPass" required
                    oninput="textChange()">
            </div>
            <div>
                <span class="showPass" >
                    <img  class="eye-close" id="img1" src="https://i.postimg.cc/HWMtCN1m/eye-close.png" alt="eye"
                        onclick="toggle()"
                        >
                </span>
            </div>
        </div>
        <div class="validator">
            <p id="capital">
                <i class="fas fa-times"></i>
                <i class="fas fa-check"></i>
                <span>Upper Case</span>
            </p>
            <p id="special-char">
                <i class="fas fa-times"></i>
                <i class="fas fa-check"></i>
                <span>Special Character</span>
            </p>
            <p id="number">
                <i class="fas fa-times"></i>
                <i class="fas fa-check"></i>
                <span>Number</span>
            </p>
            <p id="more-than-8">
                <i class="fas fa-times"></i>
                <i class="fas fa-check"></i>
                <span>More than 8 characters</span>
            </p>
        </div>
    </div>

  <script src='https://kit.fontawesome.com/1c2c2462bf.js'></script>
  <script  src="./script.js"></script>

</body>
</html>
CSS :
This CSS styles a password validator form with a clean, centered layout using a Poppins font and a color scheme of light blue, dark backgrounds, and white highlights. The main container takes up the full screen, centers content, and has a light blue background, while the form box is dark with rounded corners, containing an input for password entry and an icon to toggle visibility. Visual feedback for validation criteria is provided in the .validator section, where rules (like length and character requirements) change opacity and color when met. Smooth transitions and animations add interactivity to elements like input fields, icons, and validation indicators.
@import url("https://fonts.googleapis.com/css2?family=Poppins:wght@400;500;700;800&display=swap");

body {
  margin: 0;
  color: #34495e;
  font-family: "Poppins", sans-serif;
  height: 100%;
}

.container,
.formbox {
  display: flex;
  justify-content: center;
  align-items: center;
}

.container {
  height: 100vh;
  background: #6fa5f6;
  flex-direction: column;
}

.formbox {
  background: #121726;
  width: 350px;
  height: 80px;
  border-radius: 5px;
  overflow: hidden;
  margin: 0.625rem;
}

.formbox .fa-lock {
  color: #fff;
  font-size: 1.375rem;
  position: relative;
  margin-right: 0.3125rem;
}

#myPass {
  position: relative;
  width: 180px;
  margin-right: 0.9375rem;
}

input {
  border-radius: 0.3125rem;
  border: none;
  color: #575dbc;
  font-size: 1.375rem;
  outline: none;
  margin-left: 0.9375rem;
  display: inline;
  background: none;
  transition-delay: 0.2s;
}

.showPass {
  position: relative;
  margin-left: 1.5rem;
  cursor: pointer;
}

.inner {
  background: #ffffff;
  padding: 40px 50px;
  border-radius: 5px;
  width: 250px;
  clip-path: circle(8% at 87.2% 49.2%);
  transition: all 0.25s ease-out;
  position: absolute;
  overflow: hidden;
}

.inner-hover {
  clip-path: circle(75%);
  background: #fff;
}

.color-change {
  transition-delay: 0.2s;
  color: #121726 !important;
}

.showPass .eye-open {
  margin-top: -1px !important;
  width: 26px;
  height: 25px !important;
  transition: all 0.2s ease;
}

.showPass .eye-close {
  margin-top: 0.625rem;
  width: 25px;
  height: 18px;
}

.validator {
  margin-top: 20px;
  width: 310px;
  position: relative;
  height: 190px;
  overflow: hidden;
  border-radius: 5px;
  box-shadow: 1px 1px 6px rgba(0, 0, 0, 0.2);
  padding: 7px 20px 0px;
  background-color: #121726;
}

.validator p {
  opacity: 0.6;
  transition: all 0.3s ease-out;
}

.validator p span {
  font-size: 15px;
  color: #fff;
  margin-left: 35px;
  font-weight: 500;
}

.validator p i {
  position: absolute;
  text-align: center;
  width: 20px;
  height: 20px;
  line-height: 26px;
  font-size: 15px;
  border-radius: 50%;
  color: #ffffff;
}

.fa-check {
  opacity: 0;
}

.fa-times {
  opacity: 1;
}
JavaScript:
This JavaScript code controls the behavior of a password input field with validation checks and an eye icon toggle. The toggle function switches the password input between text and password types for visibility, updating styles on the lock icon and background. The myFunction function changes the eye icon image based on visibility state. The valid and invalid functions adjust the opacity of validation icons (check and cross icons) for specific criteria—uppercase letter, number, special character, and length—based on password content, while the textChange function calls these checks each time the user types in the password field.
var lockIcon = document.querySelector(".fa-lock");
        var inner = document.querySelector(".inner");
        var password = document.querySelector("#myPass");
        var state = false;
        let text,validIcons,invalidIcons;

        function toggle(){
            myFunction();
            if(state){
                function displayPass(){
                    document.getElementById("myPass").
                    setAttribute("type","password");
                }
                setTimeout(displayPass,80);

                lockIcon.classList.remove("color-change");
                inner.classList.remove("inner-hover");
                state = false;
            }
            else{
                function displayText(){
                    document.getElementById("myPass").
                    setAttribute("type","text");
                }
                setTimeout(displayText,80);

                lockIcon.classList.add("color-change");
                inner.classList.add("inner-hover");
                state = true;
            }
        }

function myFunction(){
  var eye = document.querySelector(".eye-close");
  imgsrc = document.getElementById("img1").src;
  if(imgsrc.indexOf("eye-close")!= -1){
    eye.classList.add('eye-open');
    document.getElementById("img1").src="https://i.postimg.cc/3JHFrZ3v/eye-open.png";
  }else{
    eye.classList.remove('eye-open');
    document.getElementById("img1").src = "https://i.postimg.cc/HWMtCN1m/eye-close.png";
  }
}

        function valid(item , validIcon , invalidIcon){
            text = document.querySelector(`#${item}`);
            text.style.opacity = "1";
            validIcons = document.querySelector(`#${item} .${validIcon}`);
            validIcons.style.opacity='1';
            invalidIcons = document.querySelector(`#${item} .${invalidIcon}`);
            invalidIcons.style.opacity="0";
        }

        function invalid(item , validIcon , invalidIcon){
            text = document.querySelector(`#${item}`);
            text.style.opacity = "0.5";
            validIcons = document.querySelector(`#${item} .${validIcon}`);
            validIcons.style.opacity='0';
            invalidIcons = document.querySelector(`#${item} .${invalidIcon}`);
            invalidIcons.style.opacity="1";
        }

        function textChange(){
            if(password.value.match(/[A-Z]/) != null)
                valid('capital' , 'fa-check' , 'fa-times');
            else
                invalid('capital' , 'fa-check' , 'fa-times');

            if(password.value.match(/[0-9]/) != null)
                valid('number' , 'fa-check' , 'fa-times');
            else
                invalid('number' , 'fa-check' , 'fa-times');

            if(password.value.match(/[!@#$%^&*]/) != null)
                valid('special-char' , 'fa-check' , 'fa-times');
            else
                invalid('special-char' , 'fa-check' , 'fa-times');

            if(password.value.length >= 8)
                valid('more-than-8' , 'fa-check' , 'fa-times');
            else
                invalid('more-than-8' , 'fa-check' , 'fa-times');
        }
Congratulations! You’ve successfully crafted a Form Validation for Email and Password using HTML, CSS, and JavaScript. This simple and practical tutorial walked you through structuring the form, styling it, and implementing validation. Now equipped with this knowledge, feel free to enhance and apply it to your projects. Happy coding!
Having trouble with your project? No worries! Just click Download, grab the source code, and start your coding journey.
